MLflow Pipelines (experimental)
MLflow Pipelines is an opinionated framework for structuring MLOps workflows that simplifies and standardizes machine learning application development and productionization. MLflow Pipelines makes it easy for data scientists to follow best practices for creating production-ready ML deliverables, allowing them to focus on developing excellent models. MLflow Pipelines also enables ML engineers and DevOps teams to seamlessly deploy these models to production and incorporate them into applications.
MLflow Pipelines provides production-quality Pipeline Templates for common ML problem types, such as regression & classification, and MLOps tasks, such as batch scoring. Pipelines are structured as git repositories with YAML-based configuration files and Python code, offering developers a declarative approach to ML application development that reduces boilerplate.
MLflow Pipelines also implements a cache-aware executor for Pipeline Steps, ensuring that steps are only executed when associated code or configurations have changed. This enables data scientists, ML engineers, and DevOps teams to iterate very quickly within their domains of expertise. MLflow offers APIs and a CLI for executing pipelines and inspecting their results.
Installation
MLflow Pipelines is available as an extension of the MLflow Python library. You can install MLflow Pipelines from PyPI as follows:
pip install mlflow[pipelines]  # for pip
conda install -c conda-forge mlflow-pipelines  # for conda
Note
MLflow Pipelines requires Make, which may not be preinstalled on some systems (e.g. Windows). Please ensure Make is installed before using MLflow Pipelines.
Note
You can install MLflow Pipelines from a Databricks Notebook by running
%pip install mlflow[pipelines] or install MLflow Pipelines on a Databricks Cluster
by following the instructions at
https://docs.databricks.com/libraries/cluster-libraries.html#install-a-library-on-a-cluster.
Note that Databricks Runtime version 11.0 or greater is required in order to install MLflow Pipelines on Databricks.
Key Concepts
Steps
Steps represent individual modeling or MLOps procedures, such as ingesting data, fitting an estimator, evaluating a model against test data, or deploying a model for real-time scoring. Steps accept a collection of well-defined inputs and produce well-defined outputs according to user-defined configurations and code. MLflow Pipelines intelligently caches step outputs, ensuring that steps are only executed if their inputs, code, or configurations have changed, or if such changes have occurred in dependent steps. Steps are composed to form Pipelines.
def estimator_fn():
  from sklearn.linear_model import SGDRegressor

  return SGDRegressor(random_state=42)
split_ratios
attribute that can be overriden by
Pipeline Profiles. steps:
split:
# Train/validation/test split ratios
split_ratios: {{SPLIT_RATIOS|default([0.75, 0.125, 0.125])}}
Pipelines
A Pipeline is a composition of Steps used to solve an ML problem
or perform an MLOps task, such as developing an accurate regression model for data within a
particular domain or distributing a model to perform scalable batch inference. Pipelines
structure their code, configurations, and tests as git repositories with a standardized
directory hierarchy, as discussed in Pipeline Repositories. MLflow Pipelines includes predefined pipeline repositories
for common ML problems and MLOps tasks called Pipeline Templates.
MLflow Pipelines also provides APIs and a CLI
for running pipelines and inspecting their results.
import os
from mlflow.pipelines import Pipeline
from mlflow.pyfunc import PyFuncModel

os.chdir("~/mlp-regression-template")
regression_pipeline = Pipeline(profile="local")
# Run the full pipeline
regression_pipeline.run()
# Inspect the model training results
regression_pipeline.inspect(step="train")
# Load the trained model
regression_model_pipeline: PyFuncModel = regression_pipeline.get_artifact("model")
git clone https://github.com/mlflow/mlp-regression-template
cd mlp-regression-template
# Run the full pipeline
mlflow pipelines run --profile local
# Inspect the model training results
mlflow pipelines inspect --step train --profile local
# Inspect the resulting model performance evaluations
mlflow pipelines inspect --step evaluate --profile local
Pipeline Repositories
Pipelines are structured as git repositories with a standardized directory hierarchy. The following example provides an overview of the pipeline repository structure. It is adapted from the MLflow Regression Pipeline repository.
├── pipeline.yaml
├── requirements.txt
├── steps
│   ├── ingest.py
│   ├── split.py
│   ├── transform.py
│   ├── train.py
│   ├── custom_metrics.py
├── profiles
│   ├── local.yaml
│   ├── databricks.yaml
├── tests
│   ├── ingest_test.py
│   ├── ...
│   ├── train_test.py
│   ├── ...
The main components of the pipeline repository layout, which are common across all pipelines, are:
pipeline.yaml: The main pipeline configuration file that declaratively defines the attributes and behavior of each pipeline step, such as the input dataset to use for training a model or the performance criteria for promoting a model to production. For reference, see the pipeline.yaml configuration file from the MLflow Regression Pipeline repository.
requirements.txt: A pip requirements file specifying packages that must be installed in order to run the pipeline.
steps: A directory containing Python code modules used by the pipeline steps. For example, the MLflow Regression Pipeline repository defines the estimator type and parameters to use when training a model in steps/train.py and defines custom metric computations in steps/custom_metrics.py.
profiles: A directory containing Profile customizations for the configurations defined inpipeline.yaml. For example, the MLflow Regression Pipeline repository defines a profiles/local.yaml profile that customizes the dataset used for local model development and specifies a local MLflow Tracking store for logging model content. The MLflow Regression Pipeline repository also defines a profiles/databricks.yaml profile for development on Databricks.
tests: A directory containing Python test code for pipeline steps. For example, the MLflow Regression Pipeline repository implements tests for the transformer and the estimator defined in the respectivesteps/transform.pyandsteps/train.pymodules.
pipeline.yaml is the main
configuration file for a pipeline containing aggregated configurations for
all pipeline steps; Profile-based substitutions and
overrides are supported using Jinja2 templating syntax. template: "regression/v1"
data:
location: {{INGEST_DATA_LOCATION|default('https://nyc-tlc.s3.amazonaws.com/trip+data/yellow_tripdata_2022-01.parquet')}}
format: {{INGEST_DATA_FORMAT|default('parquet')}}
target_col: "fare_amount"
steps:
split:
split_ratios: {{SPLIT_RATIOS|default([0.75, 0.125, 0.125])}}
transform:
transformer_method: steps.transform.transformer_fn
train:
estimator_method: steps.train.estimator_fn
evaluate:
validation_criteria:
- metric: root_mean_squared_error
threshold: 10
- metric: weighted_mean_squared_error
threshold: 20
register:
model_name: "taxi_fare_regressor"
metrics:
custom:
- name: weighted_mean_squared_error
function: weighted_mean_squared_error
greater_is_better: False
primary: "root_mean_squared_error"
Profiles
As you develop and iterate on pipelines, you will likely need to explore a variety of configuration and code changes to arrive at an optimal solution. For example, in the context of model training, it is often important to experiment with different datasets, feature transformations, and model parameters. Pipeline Profiles offer a systematic approach for incrementally testing changes in collaborative contexts, enabling multiple team members to collaborate on the same pipeline steps while minimizing code and configuration conflicts. Profiles also make it very easy to customize and run pipelines across different environments, such as development, staging, and production workspaces.
A profile is a collection of customizations for the configurations defined in the pipeline’s main pipeline.yaml file. Profiles are defined as YAML files within the pipeline repository’s profiles directory. When running a pipeline or inspecting its results, the desired profile is specified as an API or CLI argument.
import os
from mlflow.pipelines import Pipeline

os.chdir("~/mlp-regression-template")
# Run the regression pipeline to train and evaluate the performance of an ElasticNet regressor
regression_pipeline_local_elasticnet = Pipeline(profile="local-elasticnet")
regression_pipeline_local_elasticnet.run()
# Run the pipeline again to train and evaluate the performance of an SGD regressor
regression_pipeline_local_sgd = Pipeline(profile="local-sgd")
regression_pipeline_local_sgd.run()
# After finding the best model type and updating the 'shared-workspace' profile accordingly,
# run the pipeline again to retrain the best model in a workspace where teammates can view it
regression_pipeline_shared = Pipeline(profile="shared-workspace")
regression_pipeline_shared.run()
git clone https://github.com/mlflow/mlp-regression-template
cd mlp-regression-template
# Run the regression pipeline to train and evaluate the performance of an ElasticNet regressor
mlflow pipelines run --profile local-elasticnet
# Run the pipeline again to train and evaluate the performance of an SGD regressor
mlflow pipelines run --profile local-sgd
# After finding the best model type and updating the 'shared-workspace' profile accordingly,
# run the pipeline again to retrain the best model in a workspace where teammates can view it
mlflow pipelines run --profile shared-workspace
The following profile customizations are supported:
- overrides
If the
pipeline.yamlconfiguration file defines a Jinja2-templated attribute with a default value, a profile can override the value by mapping the attribute to a different value using YAML dictionary syntax. Note that override values may have arbitrarily nested types (e.g. lists, dictionaries, lists of dictionaries, …).Examplepipeline.yamlconfiguration file defining an overrideableRMSE_THRESHOLDattribute for validating model performance with a default value of10steps: evaluate: validation_criteria: - metric: root_mean_squared_error # The maximum RMSE value on the test dataset that a model can have # to be eligible for production deployment threshold: {{RMSE_THRESHOLD|default(10)}}
- substitutions
If the
pipeline.yamlconfiguration file defines a Jinja2-templated attribute without a default value, a profile must map the attribute to a specific value using YAML dictionary syntax. Note that substitute values may have arbitrarily nested types (e.g. lists, dictionaries, lists of dictionaries, …).
- additions
If the
pipeline.yamlconfiguration file does not define a particular attribute, a profile may define it instead. This capability is helpful for providing values of optional configurations that, if unspecified, a pipeline would otherwise ignore.Examplelocal.yamlprofile that specifies a sqlite-based MLflow Tracking store for local testing on a laptopexperiment: tracking_uri: "sqlite:///metadata/mlflow/mlruns.db" name: "sklearn_regression_experiment" artifact_location: "./metadata/mlflow/mlartifacts"Warning
If the
pipeline.yamlconfiguration file defines an attribute that cannot be overridden or substituted (i.e. because its value is not specified using Jinja2 templating syntax), a profile must not define it. Defining such an attribute in a profile produces an error.
Reproducible Runs
![]()
![]()
MLflow Pipelines integrates with MLflow Tracking to provide a comprehensive, reproducible record of pipeline runs. For example, each complete execution of the MLflow Regression Pipeline creates a new MLflow Run that records dataset profiles, the trained model, model parameters, model performance metrics across training, validation, & test datasets, model explanations, and more.
Additionally, because MLflow Pipelines are structured as git repositories, it is easy to track code and configuration changes during development and collaboratively review them with team members.
Usage
The general workflow for using MLflow Pipelines is as follows:
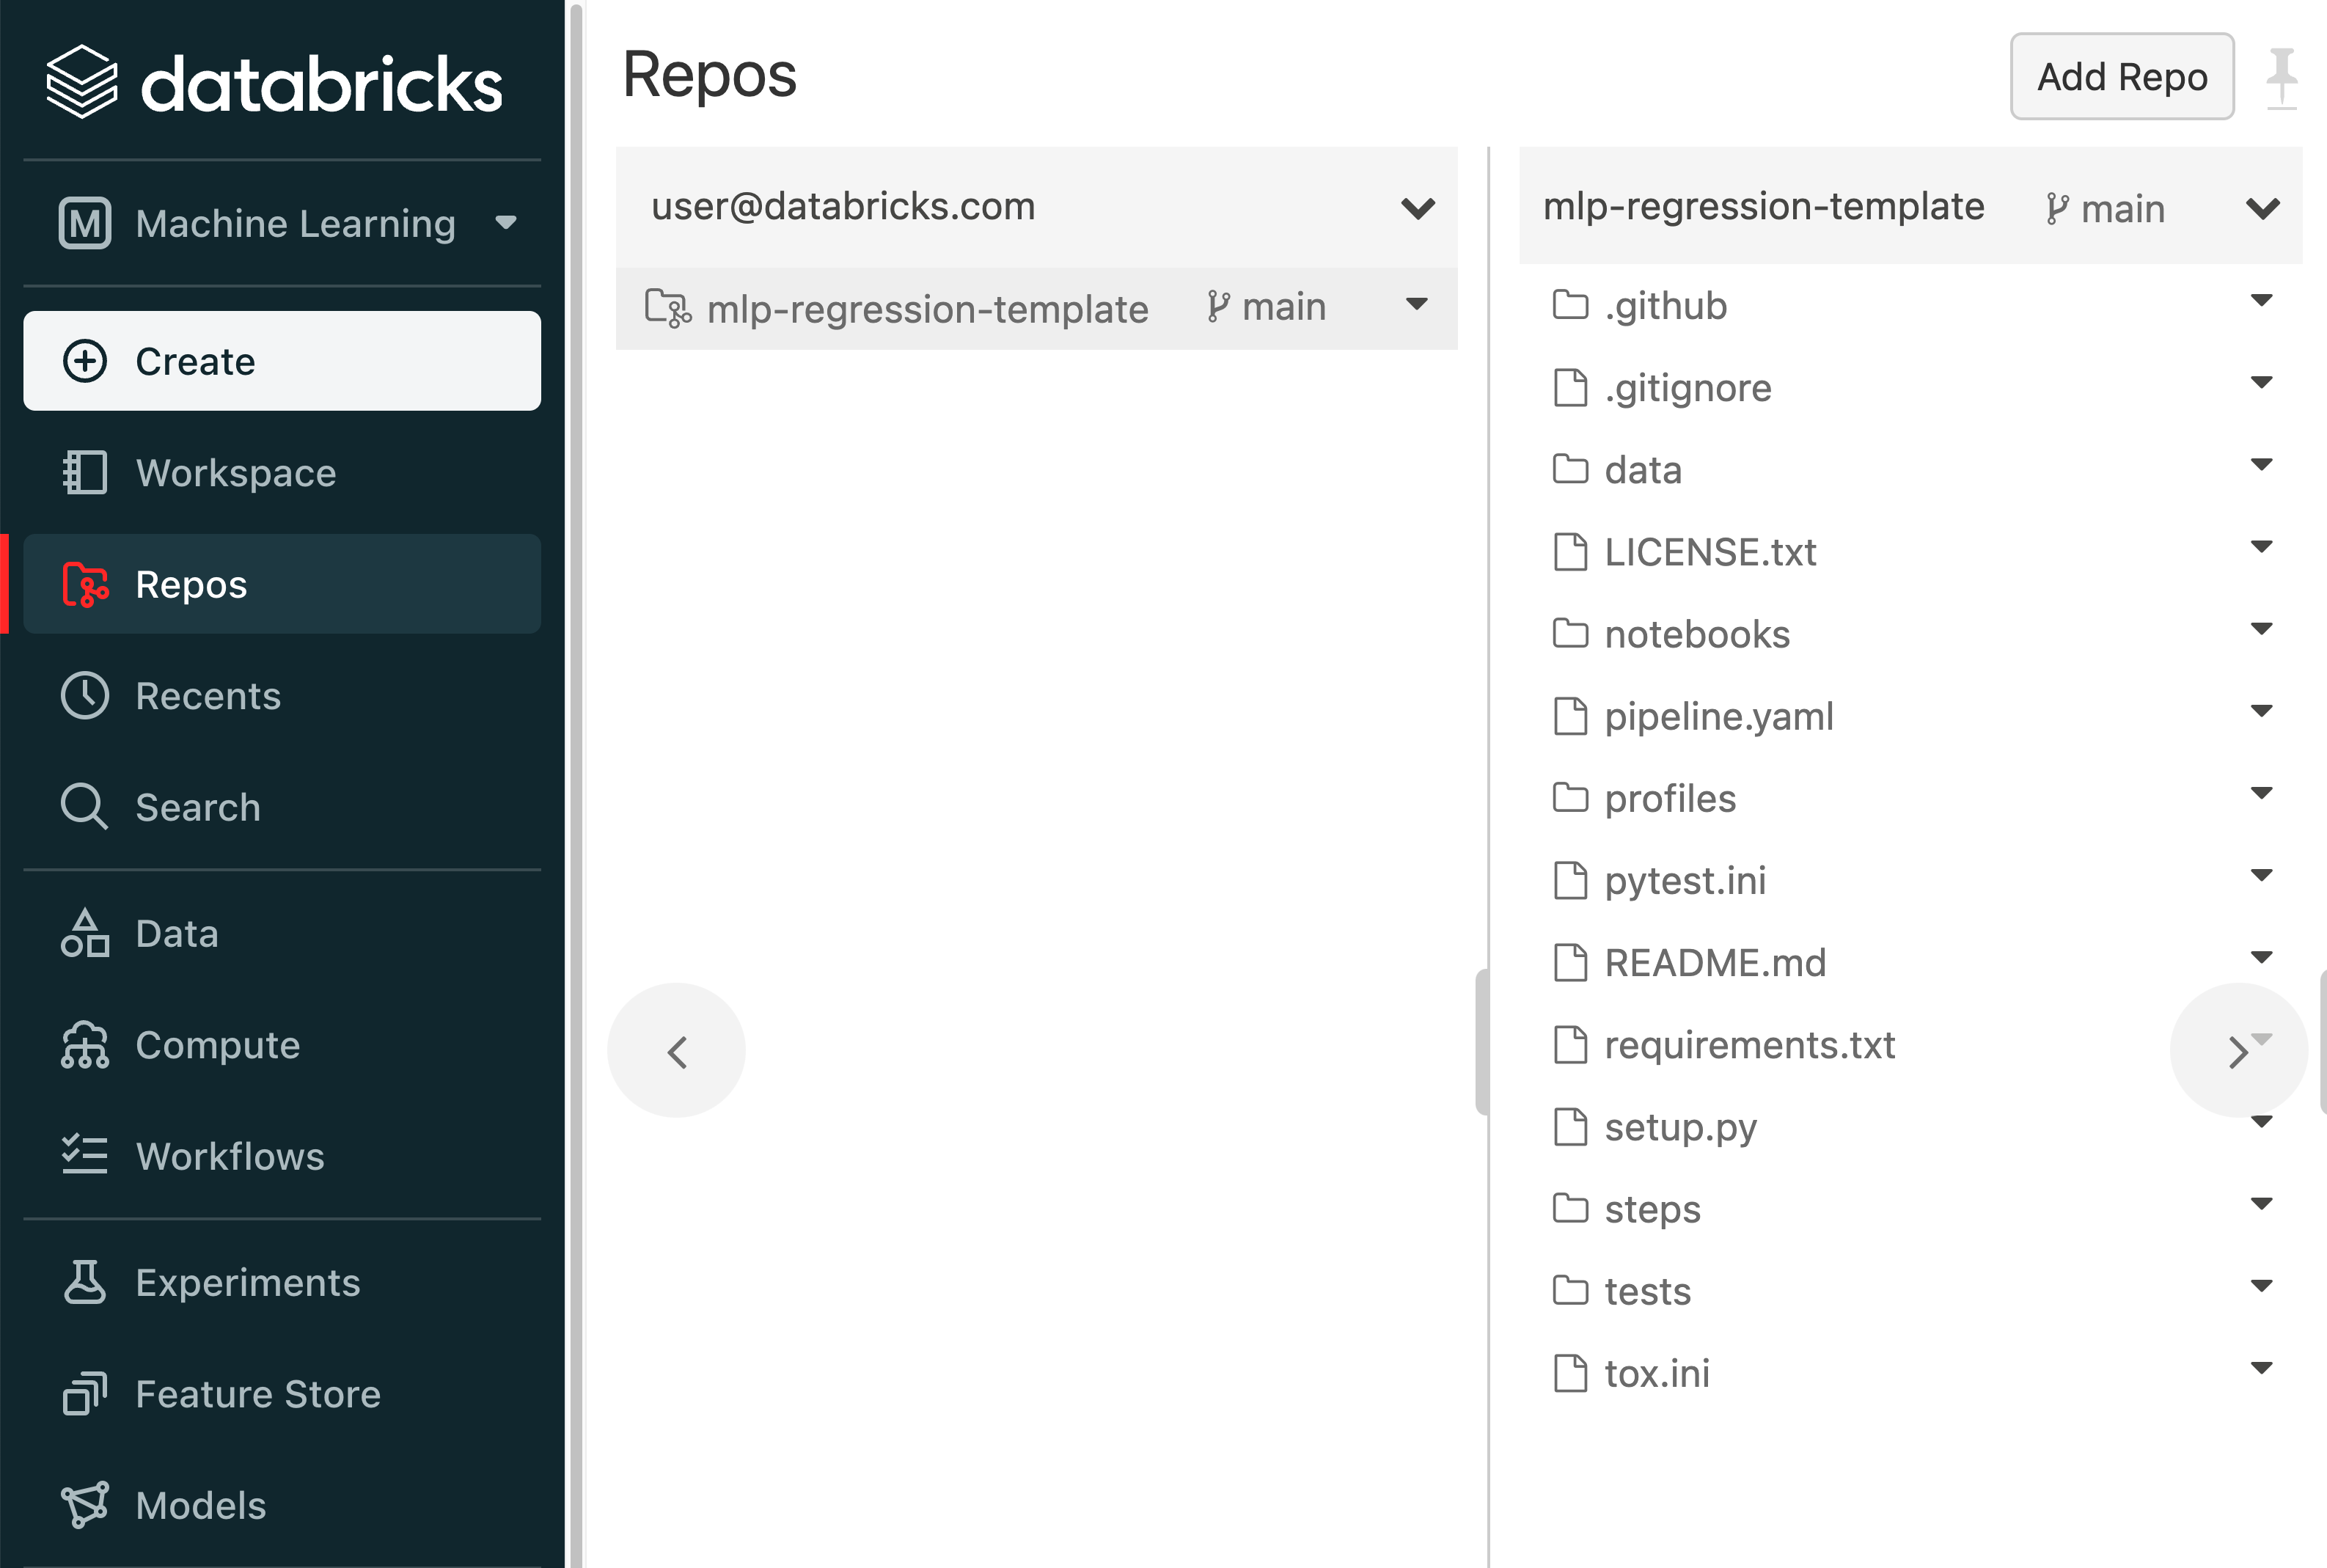
Clone a Pipeline Template git repository corresponding to the ML problem that you want to solve or the MLOps task that you want to perform. View the template’s README file for information about the Pipeline Steps that it defines and the results that it produces.
An example of cloning the MLflow Regression Pipeline repositorygit clone https://github.com/mlflow/mlp-regression-template
Note
On Databricks, we recommend cloning the Pipeline Template git repository using Databricks Repos.
Run the pipeline and inspect its results. When a pipeline run completes, MLflow Pipelines creates and displays an interactive Step Card with the results of the last executed step.
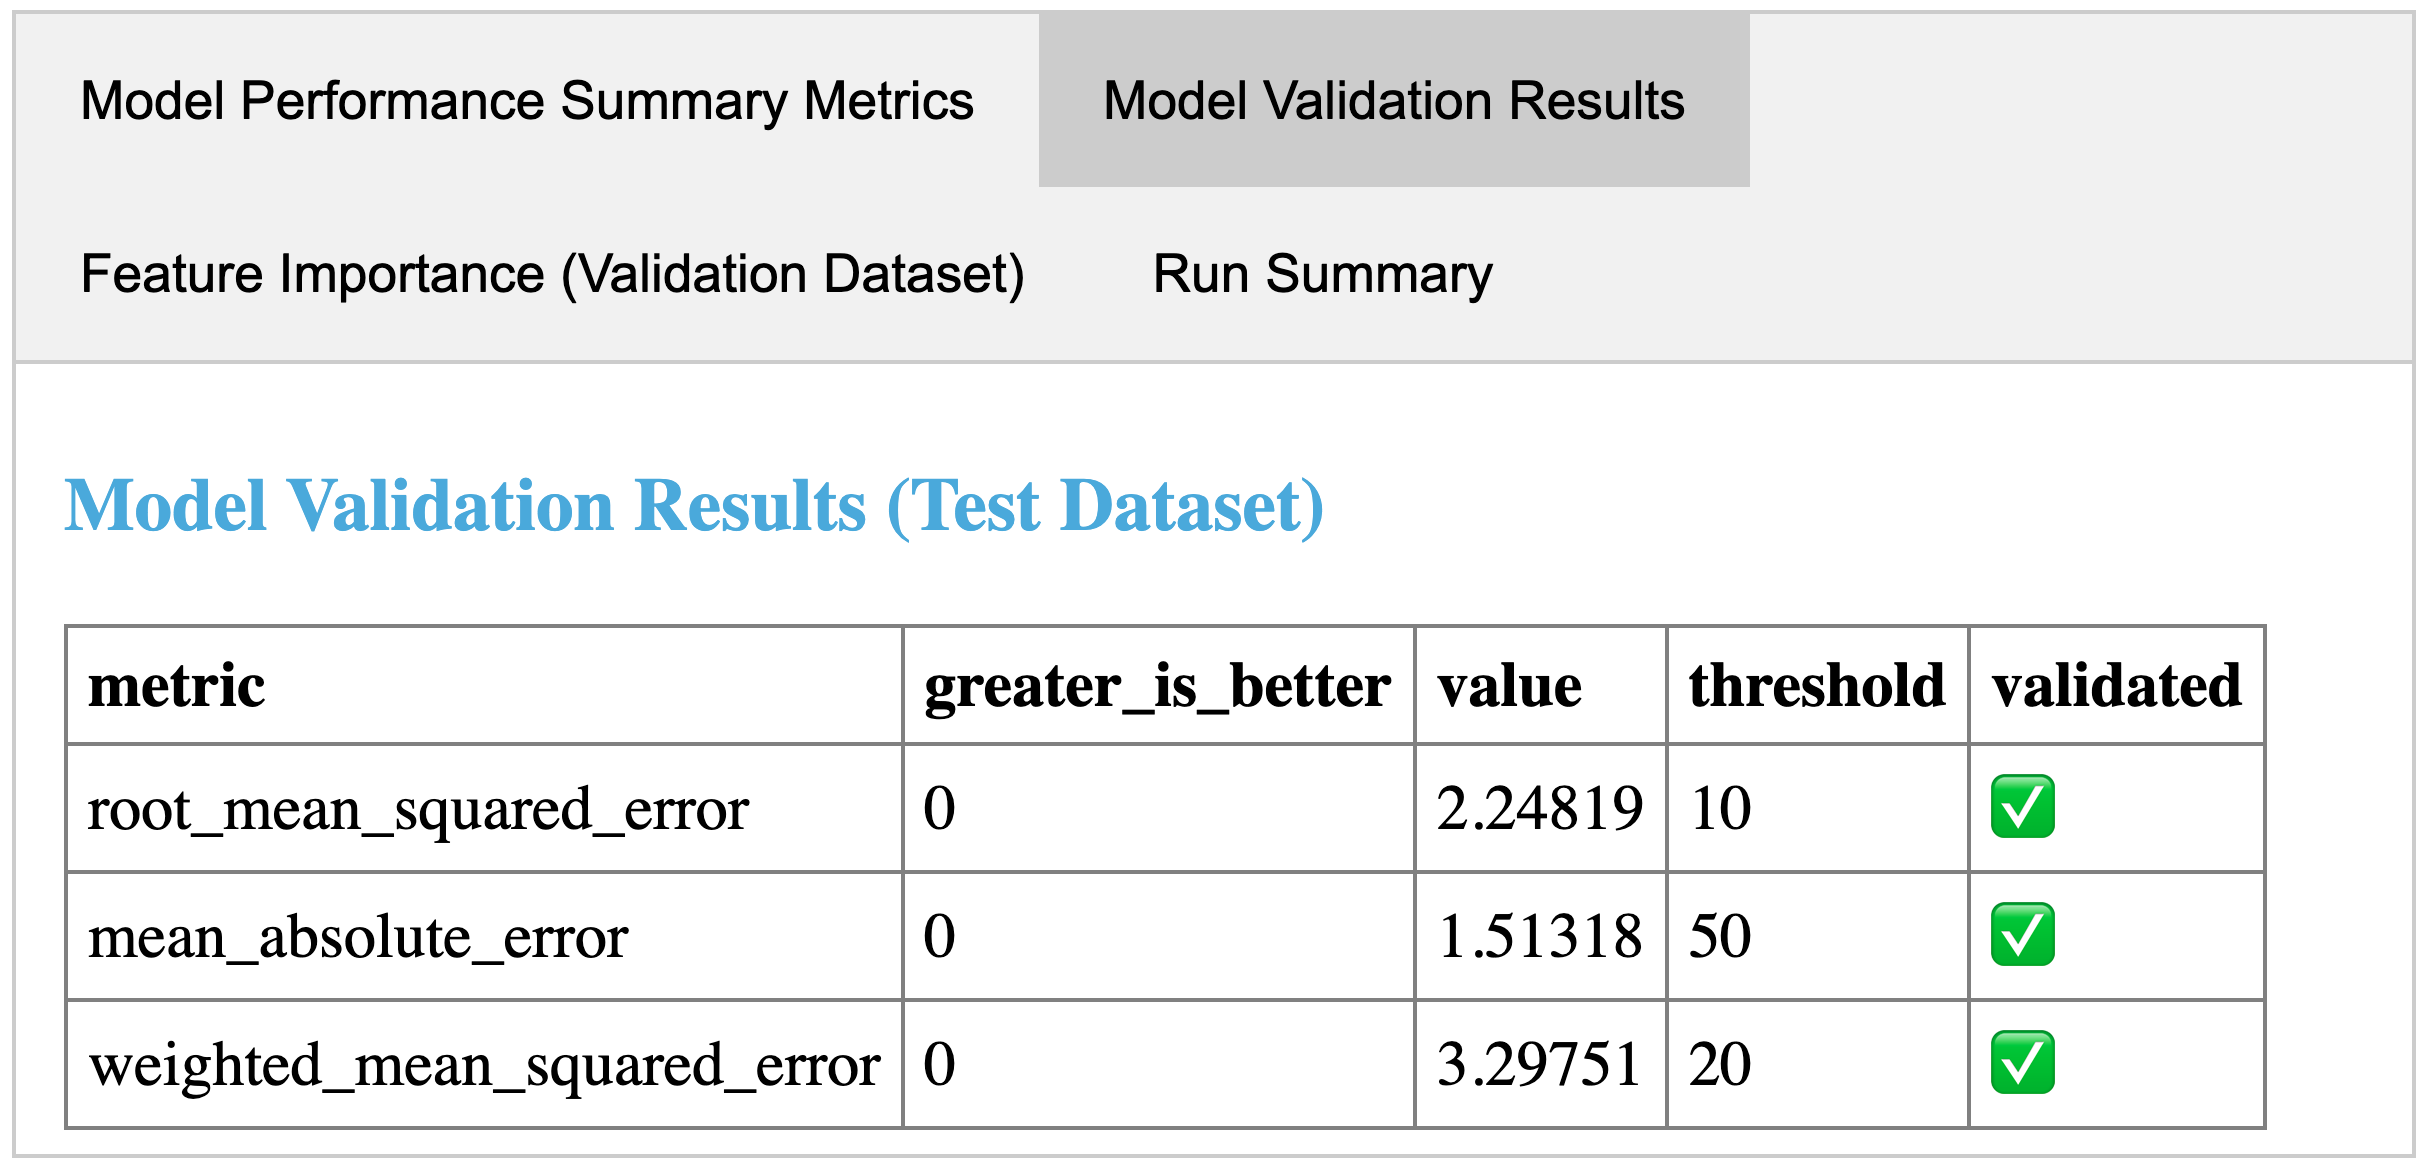
An example step card produced by running the evaluate step of the MLflow Regression Pipeline. The step card results indicate that the trained model passed all performance validations and is ready for registration with the MLflow Model Registry.
Example API and CLI workflows for running the Regression Pipeline and inspecting results. Note that pipelines must be run from within their corresponding git repositories.import os from mlflow.pipelines import Pipeline from mlflow.pyfunc import PyFuncModel os.chdir("~/mlp-regression-template") regression_pipeline = Pipeline(profile="local") # Run the full pipeline regression_pipeline.run() # Inspect the model training results regression_pipeline.inspect(step="train") # Load the trained model regression_model_pipeline: PyFuncModel = regression_pipeline.get_artifact("model")
git clone https://github.com/mlflow/mlp-regression-template
cd mlp-regression-template
# Run the full pipeline
mlflow pipelines run --profile local
# Inspect the model training results
mlflow pipelines inspect --step train --profile local
# Inspect the resulting model performance evaluations
mlflow pipelines inspect --step evaluate --profile local
Note
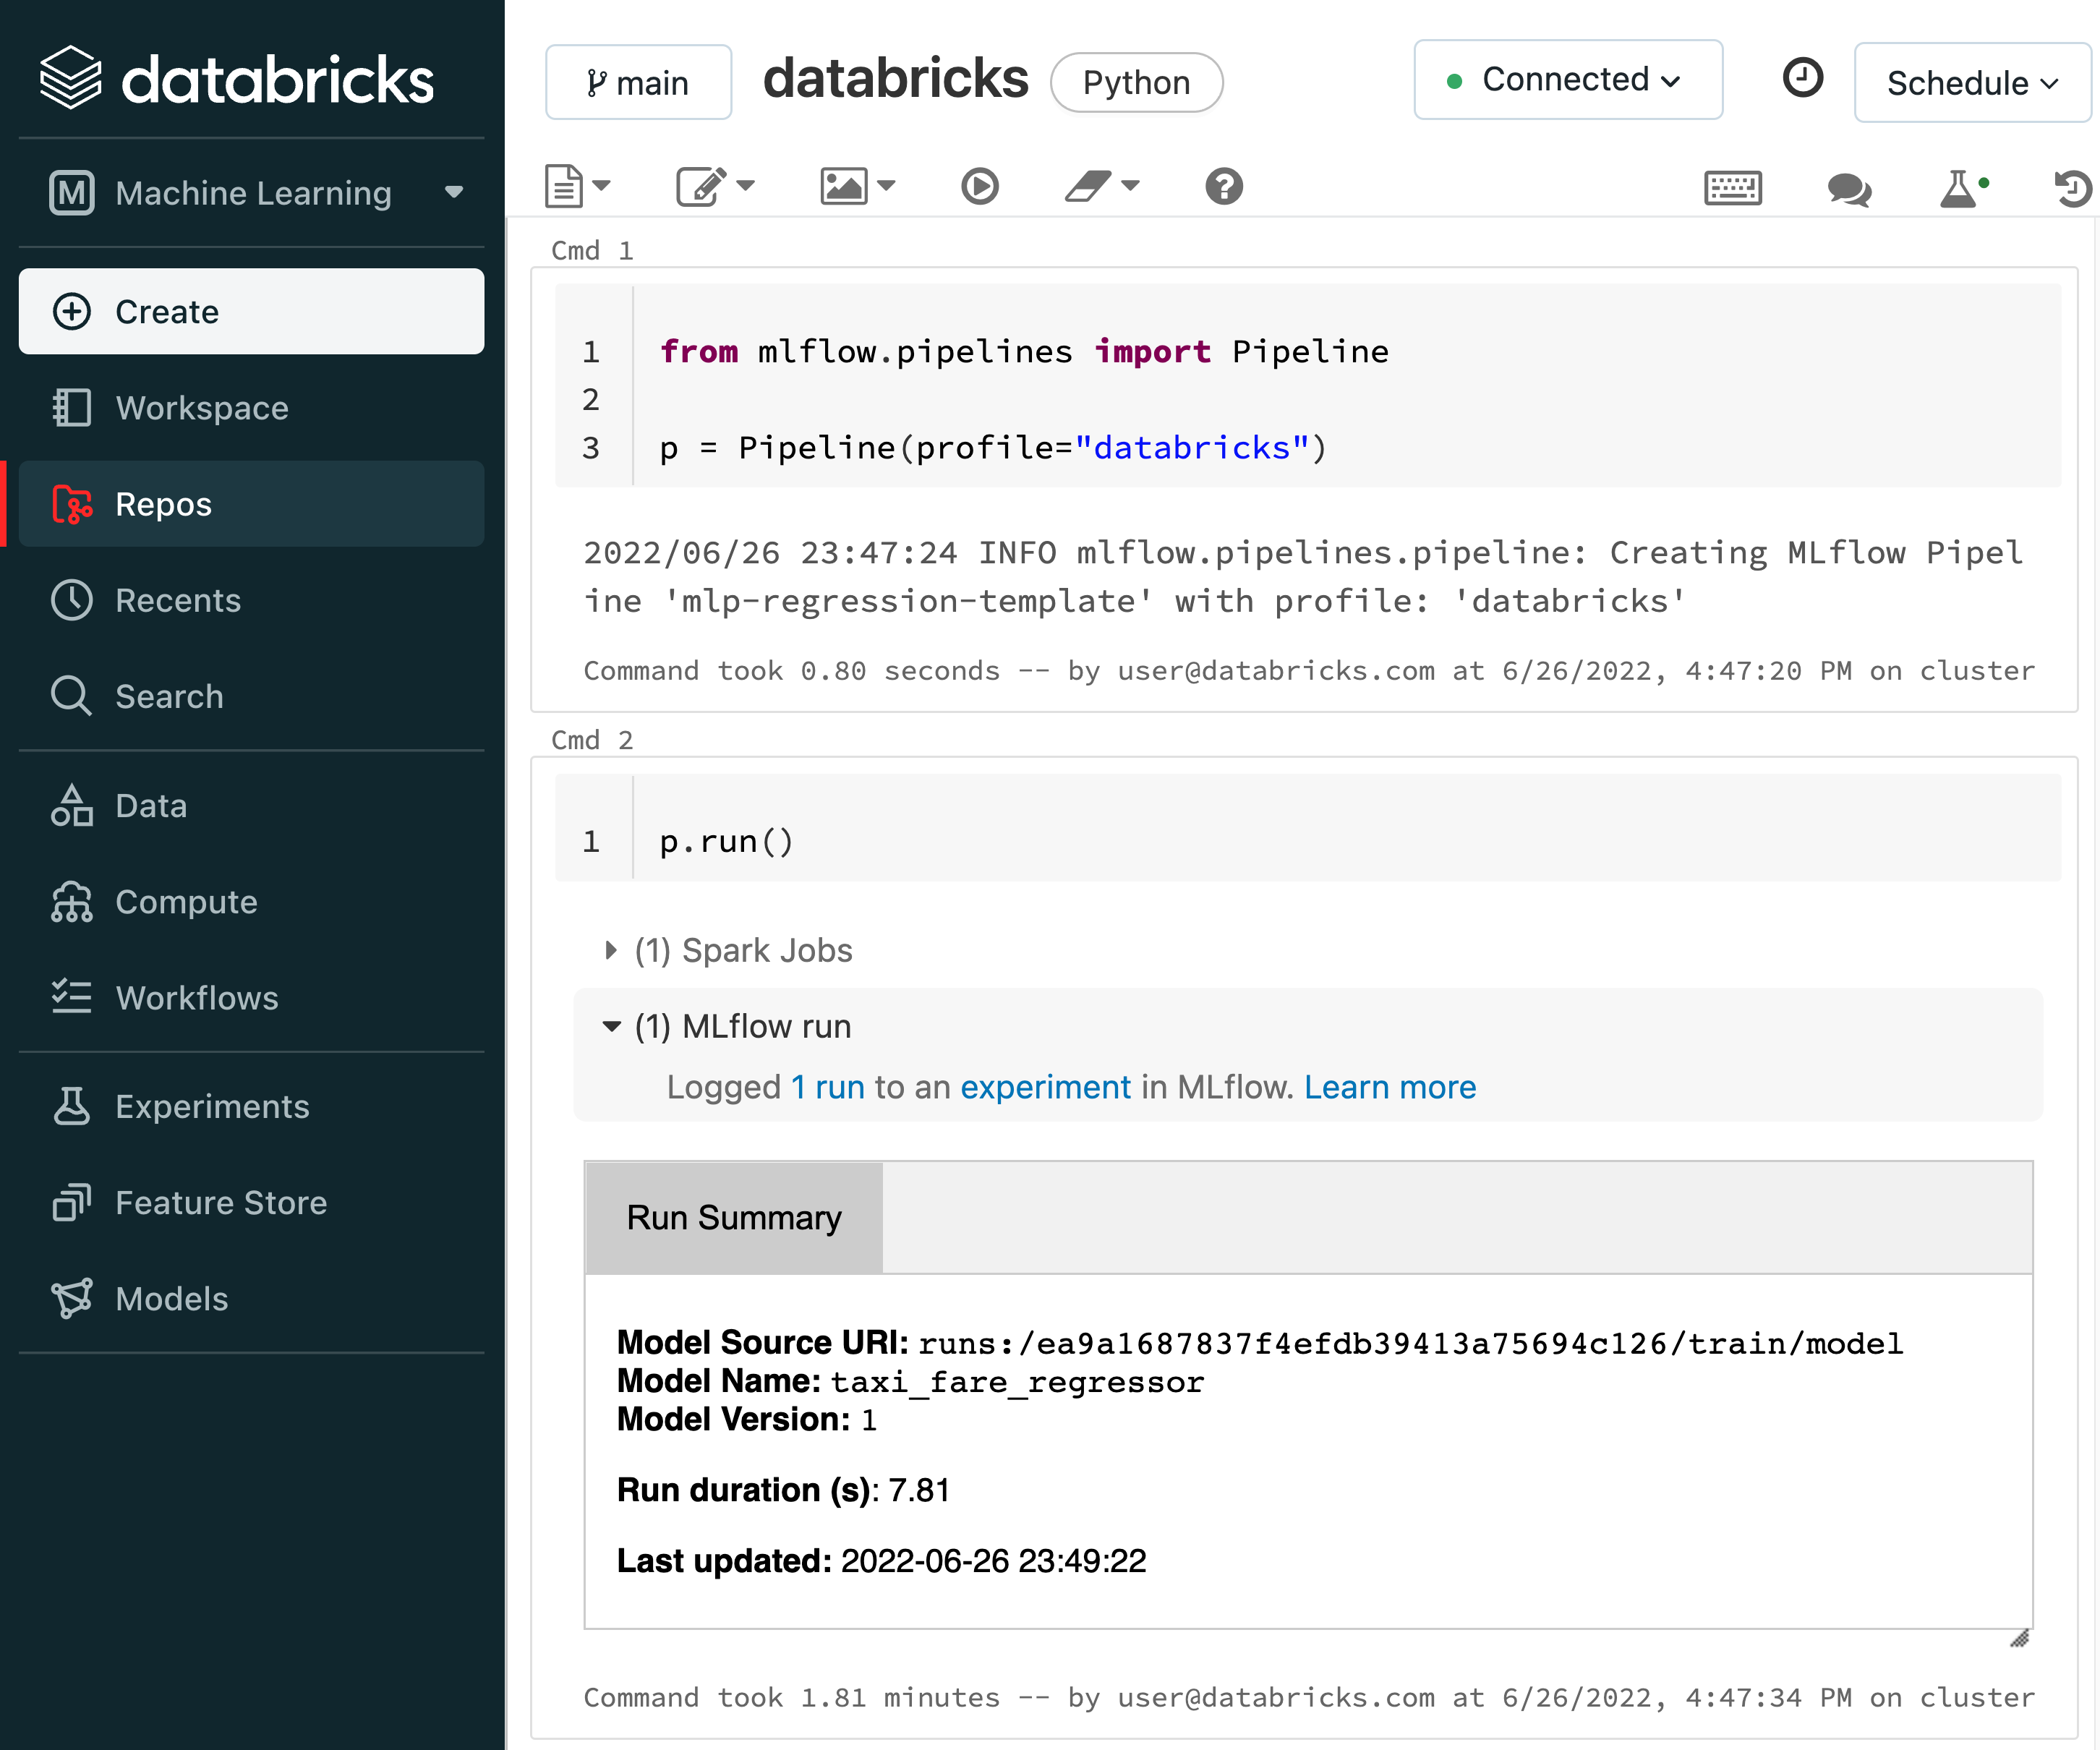
Each Pipeline Template also includes a Databricks Notebook and a Jupyter Notebook for running the pipeline and inspecting its results.
Example pipeline run from the Databricks Notebook included in the MLflow Regression Pipeline repository:
Make changes to the code and configurations in the Pipeline Repository. Code changes are made by modifying Python modules in the
stepssubdirectory. Configuration changes are made by editing the mainpipeline.yamlconfiguration file, as well as profile-specific configuration files in theprofilessubdirectory.Note
When making changes to pipelines on Databricks, it is recommended that you either edit files on your local machine and use dbx to sync them to Databricks Repos, as demonstrated below, or edit files in Databricks Repos by opening separate browser tabs for each YAML file or Python code module that you wish to modify.
Example workflow for efficiently editing a pipeline on a local machine and synchronizing changes to Databricks Repos# Install the Databricks CLI, which is used to remotely access your Databricks Workspace pip install databricks-cli # Configure remote access to your Databricks Workspace databricks configure # Install dbx, which is used to automatically sync changes to and from Databricks Repos pip install dbx # Clone the MLflow Regression Pipeline repository git clone https://github.com/mlflow/mlp-regression-template # Enter the MLflow Regression Pipeline repository directory and configure dbx within it cd mlp-regression-template dbx configure # Use dbx to enable syncing from the repository directory to Databricks Repos dbx sync repo -d mlp-regression-template # Iteratively make changes to files in the repository directory and observe that they # are automatically synced to Databricks Repos ...
Test changes by running the pipeline and observing the results it produces. MLflow Pipelines intelligently caches results from each Pipeline Step, ensuring that steps are only executed if their inputs, code, or configurations have changed, or if such changes have occurred in dependent steps. Once you are satisfied with the results of your changes, commit them to a branch of the Pipeline Repository in order to ensure reproducibility, and share or review the changes with your team.
Note
Before testing changes in a staging or production environment, it is recommended that you commit the changes to a branch of the Pipeline Repository to ensure reproducibility.
Note
By default, MLflow Pipelines caches results from each Pipeline Step within the
.mlflowsubdirectory of the home folder on the local filesystem. TheMLFLOW_PIPELINES_EXECUTION_DIRECTORYenvironment variable can be used to specify an alternative location for caching results.
Pipeline Templates
MLflow Pipelines provides extensible templates that deliver predefined solutions for common ML problems and MLOps tasks. Each template is a fully-functional pipeline that can be easily modified to fit your use cases. MLflow Pipelines currently offers the following extensible templates for developing end-to-end machine learning applications:
- MLflow Regression Pipeline
The MLflow Regression Pipeline is designed for developing high-quality regression models. For more information, see the Regression Pipeline overview, the Regression Pipeline API documentation, and the Regression Pipeline template repository.
Additional pipelines for a variety of ML problems and MLOps tasks are under active development.
Regression Pipeline

A visual overview of the MLflow Regression Pipeline produced by the
RegressionPipeline.inspect() API
The MLflow Regression Pipeline is an MLflow Pipeline for developing high-quality regression models.
It is designed for developing models using scikit-learn and frameworks that integrate with
scikit-learn, such as the XGBRegressor API from XGBoost. The corresponding pipeline
template repository is available at https://github.com/mlflow/mlp-regression-template, and the
RegressionPipeline API Documentation provides instructions for
executing the pipeline and inspecting its results.
The training pipeline contains the following sequential steps:
ingest -> split -> transform -> train -> evaluate -> register
The batch scoring pipeline contains the following sequential steps:
ingest -> predict
The pipeline steps are defined as follows:
- ingest
The ingest step resolves the dataset specified by the ‘data’ section in pipeline.yaml and converts it to parquet format, leveraging the custom dataset parsing code defined in steps/ingest.py if necessary. Subsequent steps convert this dataset into training, validation, & test sets and use them to develop a model.
Note
If you make changes to the dataset referenced by the ingest step (e.g. by adding new records or columns), you must manually re-run the ingest step in order to use the updated dataset in the pipeline. The ingest step does not automatically detect changes in the dataset.
- split
The split step splits the ingested dataset produced by the ingest step into a training dataset for model training, a validation dataset for model performance evaluation & tuning, and a test dataset for model performance evaluation. The fraction of records allocated to each dataset is defined by the
split_ratiosattribute of the ‘split’ step definition in pipeline.yaml. The split step also preprocesses the datasets using logic defined in steps/split.py. Subsequent steps use these datasets to develop a model and measure its performance.
- transform
The transform step uses the training dataset created by split to fit a transformer that performs the transformations defined in steps/transform.py. The transformer is then applied to the training dataset and the validation dataset, creating transformed datasets that are used by subsequent steps for estimator training and model performance evaluation.
- train
The train step uses the transformed training dataset output from the transform step to fit an estimator with the type and parameters defined in steps/train.py. The estimator is then joined with the fitted transformer output from the transform step to create a model pipeline. Finally, this model pipeline is evaluated against the transformed training and validation datasets to compute performance metrics; custom metrics are computed according to definitions in steps/custom_metrics.py and the ‘metrics’ section of pipeline.yaml. The model pipeline and its associated parameters, performance metrics, and lineage information are logged to MLflow Tracking, producing an MLflow Run.
- evaluate
The evaluate step evaluates the model pipeline created by the train step on the test dataset output from the split step, computing performance metrics and model explanations. Performance metrics are compared against configured thresholds to compute a
model_validation_status, which indicates whether or not a model is good enough to be registered to the MLflow Model Registry by the subsequent register step. Custom performance metrics are computed according to definitions in steps/custom_metrics.py and the ‘metrics’ section of pipeline.yaml. Model performance thresholds are defined in the ‘validation_criteria’ section of the ‘evaluate’ step definition in pipeline.yaml. Model performance metrics and explanations are logged to the same MLflow Tracking Run used by the train step.
- register
The register step checks the
model_validation_statusoutput of the preceding evaluate step and, if model validation was successful (as indicated by the'VALIDATED'status), registers the model pipeline created by the train step to the MLflow Model Registry. If themodel_validation_statusdoes not indicate that the model passed validation checks (i.e. its value is'REJECTED'), the model pipeline is not registered to the MLflow Model Registry. If the model pipeline is registered to the MLflow Model Registry, aregistered_model_versionis produced containing the model name and the model version.Note
The model validation status check can be disabled by specifying
allow_non_validated_model: truein the ‘register’ step definition of pipeline.yaml, in which case the model pipeline is always registered with the MLflow Model Registry when the register step is executed.
predict - The predict step
For more information, see the Regression Pipeline overview, the Regression Pipeline API documentation, and the Regression Pipeline template repository.